Friday, May 25, 2012

DIY Wampa Rug - Star Wars

If your child wants a Star Wars room, I'm sure you've come across the Wampa Rug. If you cringed when you saw the size and price of it then you're not alone. Feeling brave (or desperate)? You can make your own! I am totally not skilled with sewing and crafts. I can follow directions but things usually don't turn out as planned when I try my own thing (see my trash bag for the car post for proof). If I can do it without any help, you can do it! Hopefully, my guide will be helpful to you.

My total cost was $47 but if you have a JoAnn's near you then get one of their 50% off coupons and get the fabric there. Furry fabric isn't the cheapest stuff ever. Here are the quantities I bought:
1/2 yard black vinyl
1/2 yard grey vinyl
1 1/2 yards faux fur (curly Mongolian white is what mine was called)
1 1/2 yards wintry fleece (ivory) (or whatever you want to use if you want a backing)


 1. Cut out fur and backing. I used my 9 year old for the shape. If you want the fabrics to match then cut them right sides together. If you use an Xacto knife you should have less cut fur around the edges. Since I was sewing the fur to the backing I didn't worry about it.
 2. Sew the fabrics together with right sides facing in. Only sew to the lower sides  of the arms. You want to be able to sew the claws in the hands. If you want claws on the feet, leave open space for them as well. (I know, the pictures are crappy. Sorry!)


3. Cut the claws out of the black vinyl. Just cut long triangles. Sew the long edge of the triangles with right sides facing in. Turn right side out and fill with fiberfill or cotton balls (anything soft will work).
4. While you have the black thread in your machine (if you switched), go ahead and make the horn things. I just made one big C and fed it through two holes in the fur. Mine ended up being way too long so I used a rubber band to scrunch it up smaller in the middle where you can't see it. I cut mine too thin so I had to make two of them and sew them together.


5. With right sides facing, sew along the outer edge. Leave room at the end to turn it right-side out. You'll really enjoy that step. I used a metal chopstick to help. After you get it turned right-side out, fill the horn with fiberfill (or whatever you're using). Sew up the end. (I tried to use the sewing machine for this but the sewing machine told me, "No way.".)

6. Make the brains of the Wampa. Whatever you want to do that makes it puff out like a head. I used leftover  fabric and just put rubber bands around it to keep it in a ball.


7. Sew the claws on the Wampa; 5 on each hand (I couldn't say for sure about the feet. We chose not to do the feet.). Your Wampa will still be inside out. When you sew the claws, you shouldn't see them sticking out. I wish I had made mine a little bit longer to give me more sewing room.
8. Turn the hands right side out to check that you sewed them on correctly. Turn it back inside out.
9.  Put the brain inside the Wampa (shove it down out of your way). Sew up most of the Wampa, leaving space to get everything right-side out. Turn it right-side out.

10. Sew up the opening. The sewing machine was okay doing this part.

11. Make the face. I just used heavy duty glue for this (E6000). Cut out the grey vinyl in a football shape. Cut out the black vinyl in a smaller football shape. Cut out some scrap fleece in triangles for the teeth. Glue the grey onto the black then glue the teeth onto the black. For the eyes, just cut out grey vinyl in whatever shape that's supposed to be and cut the black vinyl for the eyes. Glue the eyes onto the grey.


12. Glue the face onto the Wampa. Watch out for where you want the fur to be-under the face or in the eyes.
13. Cut two small slits in the head for the horn then run the horn through the holes. I did put some Fray Check on the slits to keep the fur from shedding.
14. Sew behind the head to keep the brains in place. I just did a few really long stitches through the fur and backing. 

That's it! You should be done!
See the Star Wars room!

Friday, May 18, 2012

Traveling With Older Kids

I found a ton of tips on traveling with little ones but there is just not that much information on traveling with older kids. I guess people think we've already figured it out by the time they get in the double digits.
So, a 9 hour trip with a packed car; No extra space and 3 kids squished into the back seat. I, of course, had to at least try to avoid the fast food stops I knew were coming along with the resulting delays and blah feeling from eating that crap.
I don't believe in total deprivation but I do prefer to save junk food for special times. This makes it much more special for the kids and they get excited about the little stuff. :-) I'll call this a special time but it could also be in the "desperate times" category.
I'll start with keeping them entertained. If you have any ideas, please add them!!

What to do! 
Movie Time for One

*DVD Players -(RCA Dual Portable DVD Player). These were great! I highly recommend them. I got a great price on them at Shop.com. They played everything except for our DIVX movies. I did have to get an amplifier because the sound wasn't so great with headphones. Did you know you can get amplifiers that are splitters as well so kids can plug up more headphones to the DVD player? That's one of those things I just never needed to know. :-)

*Car-friendly arts and crafts
 -sketching
 -pipe cleaners
 -origami
 -coloring books
 -mazes/trivia books
 -travel bingo (favorite for all of us)
 -etc...Take your kids to Michaels and let them pick some stuff out. They like it more when it's their idea.

*Books
 -Find the latest book that they might like and bring it along. It's great to have during those times when they get bored during the vacation.

*Handheld Electronics
 -You know they can't live without them. :-) Is there a new game out? Peace in the car might be worth the cost (sometimes not, though).

FOOD!

Breakfast Burritos -These were great in helping us get an early start! I just scrambled eggs and put them in flour tortillas. I threw them in the freezer in a pan with aluminum foil on top then just baked them as soon as I got up. I used the tried and true 350. If you don't have time to finish baking them (or start) just microwave with a damp paper towel. (Okay, mine were tacos but I got the authentic tortillas from the local Mexican restaurant/store.)

Breakfast Burritos

Salad in a Jar-These turned out great! They'll last for days and taste just as fresh as when you make them. I had the kids make their own so that they would want to eat it. I got thick slices of turkey from the deli for ours. Some delis won't do the really thick slices-Whole Foods did. (Get the bigger Mason jars with the wide top.) We put croutons in another jar so they'd stay crunchy.
Salad, Fruit and Nut Bars, String Cheese, Deviled Eggs

Sandwiches-I made these the day before we left then put them in the freezer. Just make sure you put the meat on one side and the cheese on the other with the mayo and stuff in the middle to keep the bread from getting soggy. They fit great in a plastic shoe box (Target).
Sandwiches, chocolate bars, yogurt

Sausage Balls-The recipe calls for almond flour. I used 1/2 almond flour and 1/2 regular. I think I'll just use regular next time. They were good warm but I didn't care for them as much cold. The recipe is a good one, though. *Tip for the butter: Use a cheese grater for the butter.

Snack Bags- I put each thing in a snack baggie then put the snack baggies in a huge plastic bag for each person. This worked great!!! No extra space needed for boxes, no extra trash everywhere, no having to share, no having to find things for everyone the whole trip!! Here's the list of what I put in but you can customize it for your tastes. I was going to add popcorn but didn't get around to it. I made up extra baggies for the return trip and just refilled everyone's bags when it was time to go back home.
-M&Ms
-Dried Apples
-Twizzlers
-Trail Mix
-Dried Bananas
-Sunflower Seeds
-Vanilla Wafers
-Fruit Rollups (simply fruit)
-Envirokids Crispy Rice Bars
-Nature's Path Peanut Choco Granola Bars
-Yogurt Covered Strawberries
-Gummy Bunnies Fruit Snack
-Marshmallows-mini vanilla (great to have if hot choc. is a possibility)
-Jelly Beans
-Chocolate Wafers
-Cheddar Bunnies
-Graham Bunnies
-Sour Cream and Onion Bunnies
-Pretzels
-Napkin with plastic utensils 
Snack Bags

Deviled Eggs

Fruit and Nut Bars (Larabars)

Apples (cut and wrapped with a rubber band-worked great!)
Apples-cut

Healthy Snack/Meal-(container with the green lid, from Target)
-Baby carrots
-Grapes (paper towel under them will absorb excess moisture)
-Diced cheese
-Thick chunks of turkey
Healthy Snack, Apples

String Cheese

Gogurt- I froze these before we left so they'd stay colder

Chocolate Bars-Froze them the night before

Frozen Waters-These worked great! They stayed cold and kept the kids that drink too much (for the car anyway) from having bladder issues. Keep in mind that water expands when it freezes so prepare for the initial bottle opening.

*Note on the Coleman Cooler. I didn't think about this until it was too late to order one. It worked fine but I wish it would have gotten colder. It is able to plug into the car or the house so that was a nice feature. It fit in the trunk of the Honda Accord. I'm not totally thrilled with it, I think there are better options out there, but it does work. It beats using a bunch of ice.


Thursday, May 17, 2012

Homeschooling -"I could never do that!"

When people find out I homeschool, one of the top reactions I get is: "Wow, I couldn't do that.". It truly ticks me off when I hear this because if it's something that's important to you or necessary for your kids, you WOULD. There would be no excuses or reasons stopping you.

I'm no genius. I'm not organized. I'm temperamental. My kids aren't saints. We're not perfect. We made a choice and we make it work. There are many things that you don't know when you start homeschooling or start thinking about homeschooling. I'm sure there's someone out there somewhere that regrets homeschooling their kids but I've never met them or even heard about them. Everyone I know has been at peace with their decision to homeschool. They know that they made the right choice. No, I'm not saying everyone should homeschool and that it's the only way to raise your children. I'm talking about the ones that did decide that homeschooling was what would be best for their children.

I think many times when people tell me that they can't homeschool their children, it would be  more correct for them to say that they don't want to homeschool their children. That's fine, just don't give me stupid excuses about not being able to. It's much easier to go to work than to stay home with kids. There are exceptions, of course, but for most of us it's the simple truth. It's hard to get up and do the same things every day without someone on our backs to make us do them. When you have kids home all day, you don't just clean the kitchen, you have to continuously go behind the kids and either make them clean it or do it yourself. It's wearing to have to keep after kids to clean up their messes. It's wearing to keep after kids to stay focused on their school work. It's hard not having the adult interaction every day. It's hard knowing that you'd like to go shopping but you can't because the kids aren't finished with their school stuff yet. But we do it because it's what we feel is best for our kids. We do it because the rewards are so great that we couldn't imagine not having our kids home with us.

The family dynamics change drastically when you start homeschooling, especially if your kids have gone to public school like mine did. I have a hardheaded child. When he was in public school, I would barely be able to hug him or have a conversation with him. That all changed when I started homeschooling. At first, he felt like it was a punishment until I explained that it would have been easier for me to just let him stay in public school. I had to explain that I love him enough to want him home with me and to make sure he gets a good education. (We move around a lot so they were getting behind in school.) I never knew that many of his problems were from emotional issues. He's still hardheaded but we have a great, loving relationship that we would have never had if I did not make the choice to homeschool. I wouldn't trade that for anything!

Homeschooling doesn't have to be expensive. There are many cheap and free options out there. You don't have to be a genius. There are many curriculums out there that are basically "For Dummies" and teach for you. I'm ADD and unorganized but I've managed to find curriculums that work for me as well as the kids. :-) You're not alone out there. There are groups of homeschoolers everywhere (even online) that are more than willing to help you with anything you need! We've all been there! We completely understand the questions and uncertainties. We know the struggle to find the right curriculum and teaching style that will work for your family. We are always here to help others be successful in their homeschooling.

My organization has been the main struggle for me. It's not getting organized to get school done or anything like that. It comes down to getting meals organized. If I can figure that out, I'll be good to go. People are usually shocked to hear that I'm not organized. I've had a lot of help getting that way. FlyLady helped me with keeping the house clean and DonnaYoung helped me with getting my other stuff organized. I'm working on the meal thing. I'll write about that later when I get it figured out.

The bottom line is that most people CAN homeschool. There are always exceptions and extenuating circumstances that would make homeschooling difficult if not impossible but most people simply chose not to homeschool. That's okay! There's nothing wrong with sending your kids to public or private school if that's what you feel is best. There are some great schools out there. There are some good things that schools have that I can't offer my kids. You don't have to explain your decisions on how you've chosen to raise your child to me and I don't expect to have to explain mine. What if I responded with, "I could never send my kids to public school!". Think about it.

The Bitter Homeschooler's Wish List - Things we're thinking but are too polite to say.

Tuesday, May 8, 2012

Toothbrush Toothpaste Holder

I cannot believe I didn't think about doing this! What a great way to keep toothbrushes and toothpastes neat and organized! This took about 10 minutes to make the two holders. I hope all of this preparation makes things easier while we travel. All I did was sew lines on a washcloth and sew on ribbon.


Fruit and Nut Bars

High Fiber and High Protein! You know I'm all over it! The whole family loves these easy to make bars (or whatever shape you want). Thank you to the person that pinned the bars that somebody blogged about making from those expensive bars in the store. :-)
Ingredients:
1 Cup Nuts
1/2 Cup cherries
1-1 1/2 Cups Dates

Chop the nuts.
Add the fruit.
Mix it.
Form it into your preferred shape.
Let the kids help! My kids love this project and they're more likely to eat it if they help make it. Let them choose the ingredients. The dates are a must have. I haven't found anything else that holds it together like they do. Fresh is better but the ones in a bag worked okay. I use almonds (raw slivered worked best) but you can use another nut. I don't recommend peanuts simply because they're inflammatory but they'll work. Get creative and add chocolate chips (they have all kinds of flavors now) or something else fun. I keep my bars in the fridge. I can't tell you how long they stay good because they don't last beyond a few days.
Here's the link to the blog I mentioned. She has a link to the bars so you can see the flavors they came up with.
http://sometimesiveg.com/2011/07/homemade-cherry-larabar/

Denim Bag For Car

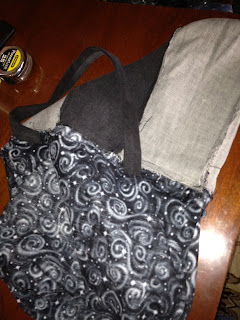
In preparation for our upcoming trip, one of the major things we are going to need is something to hold the trash. I needed something on a larger scale since I'll have 3 kids throwing crap away for 9 hours. This isn't the prettiest bag out there but I couldn't find a tutorial that would do exactly what I needed. I had to have it on the back of the seat due to lack of space in the car but I also had to have it go under the DVD player.
My sewing is so bad that I had to use the manual to figure out how to get that bobbin thread picked up. So, the way I figure it is that if I can throw something together, anyone can. I'll bet yours will look better. I'm putting all of my oopsies in here so you won't mess up these little things like I did. I don't recommend making it as big as mine. I may fix that later.


 1. Get some old jeans and cut out all of the seams so you just have 4 pieces of fabric. I cut out 3 pairs since I didn't know how much I would need but only used 2. You can use just one if you want. I wanted the contrast of colors. I saw it coming out much better in my head. :-) Iron the fabric.

 2. Sew the strips together however you want to get one piece of fabric that will be the front and back. Most of my problems came from trying to keep the pockets. There isn't a lot of fabric left over the pocket to work with. Sew the right sides of the fabric together so that the strips are facing the same direction.


3.Cut a strip off of the unused part of the jeans so you can form the handle in whatever length you need. Fold it in half lengthwise with right sides facing and sew along the edge. You'll have an inside out fabric tube. You have to turn it right side out. I used a chopstick to help. Then iron the strip with the seam in the middle (unless you want the seam to be on the side).

4. Sew the sides of the main piece of fabric together with right sides facing. After you do that, you can make  life really simple and just sew a hem along the top (fold the top of the fabric while it's still inside out enough to give you something to sew-about 1/4 inch). Then you could just attach the handle. Keep reading if you want a liner.


 5. Cut a piece of fabric about the same size as your jean fabric. My fabric is folded in half. I ran into the problem of needing more fabric over the pockets at the top so I cut a strip of fabric, sewed the ends together so it was a circle as big as the top of my bag and sewed it to the top edge of the bag with the right sides facing.


 6. Here's one of my mess-ups.  Make sure you sew the handle on in the right direction. Picking out the seam is not fun. Notice how I've sewn the lining to the bag (same as the last step, just put the lining inside the bag so that the right sides are facing. The lining will be inside out and so will the denim fabric.Look at the pic after step 5.) When sewing the lining in, you have to sew the handle in between the two fabrics. The first picture is how it looks when you're doing it wrong. You shouldn't see the handle, just the ends like in the second pic. You can put the handle wherever you want. Most people put it on the back side. Just measure from each side so both ends are the same distance from the sides of the bag. Important note: When sewing the liner to the bag, don't sew all of the way around. I forgot this part and had to take out more seams. You'll have to turn the bag right side out through the opening in the seam. Make the opening on the back side so it's not visible from the front. After you turn it right side out, iron the edges in to make it easier to sew the sides together. Then you only have one seam showing.

7. I added a snap to the middle to hold the bag closed. You just use a hammer to get those together. You could do velcro as well. I may add something like a dowel rod to the top edge of the back to make it more defined.

Here are some super great tutorials from people that actually know how to sew. I wrote mine just to give people another idea but if you look at the different tutorials, you'll find just about everything you need to know no matter how beginner you are. Used jeans are free, just try it!
Trash Bag-Car
Reversible Tote -Just change where you put the handles.
Fabric Basket - Great tip for sewing the lining. Leave a hole in the bottom seam so you don't have to have one at the top edge. Wish I saw this one before I made this!!


Friday, May 4, 2012

Fruit Smoothie

High Fiber and High Protein Fruit Smoothie-YUM!!

This is the recipe that I recommend for my weight loss clients. The vanilla shake mix I add is part of the weight loss program but is great for anyone needing a healthy snack or meal replacement. It's important to make sure meals have both fiber and protein. The combination of these two nutritional elements help you feel full longer, increase your energy, and stabilize your blood sugar.

Ingredients:
1/2 banana
1 scoop Vanilla Shake (serving size is 2 scoops so add more if you want)
Favorite frozen fruit (Handful)
Water (about 8 oz)

Throw it all in the blender. I use the liquify setting. The kids prefer to use the Magic Bullet. I've found out that I like a little bit of pineapple in mine, I can take or leave the banana, and I don't care for blackberries in it because of the seeds. So easy, so healthy!


Thursday, May 3, 2012

Build Your Own Toybox

Building your own toybox will save you money and will allow you to customize the size and shape that best suits your needs. The ones we build ended up costing around $35 each. Similar ones (but smaller) sell for around $100 each. We built 5 of them so I'd say it was well worth it to get the tools out and build it ourselves. It took us around 30 minutes to build each one. The painting is what took forever. :-)
Toy Box in Front

Having the right tools makes the job go so much faster with less frustration and mistakes. It took me years to come to this conclusion but I've finally realized that the man was right. (THAT HURT!) I've called him Tim the Toolman for years. It seems like every time we have a project, he needs a new tool for it. For this project and many others, one of the best tools he's bought has been his Paslode Finish Nailer. This tool is fast and it's fun to use!

Materials Needed For Toy Box
(3) 16X4 3/4" MDF
(2) 12X4 3/4" MDF
Saw
Hammer or Nailer
Wood Glue
Nails
Square
Damp rag to wipe excess glue
Spackle or wood putty

If buying MDF somewhere that will cut them for you, you'll need (1) 12X4 stripped to be 8X4 and (1) 16X4 to be cut in 3 16X16 pieces. We cut our own since we have the right tools to do it and because we could measure before cutting as we went along.

Instructions 
1) Cut (1) 16X4 MDF board into 3 16X16 sections. Make sure they're as close to perfect matches as you can get. These will be the sides and the middle section.

2)  Now you need to measure your angles.
     *Bottom side -make a mark at 14" (In picture, closest to the shirt).
     *At the bottom corner (near his hand and ruler) measure 8" up from the bottom corner up the side and make a mark(near the corner of the square).  Draw a line from the first mark to the second mark.
     *Top side-make a mark at 11" starting from the same side you started the bottom side.  Draw a line from the top side to the 8" mark.

3)After verifying your measurements and that the angles are correct, cut the boards along the lines. We clamped all of them together most of the time and just cut through all 3 boards at one time so they would be even. I'm sure there are other ways to do it but that's just what worked for us. We did have to move the boards around to get them cut since we don't have the saw that would have been better suited for the job. :-) (I barely held him off on that purchase!) If you cut all three at once, make sure they stay together.
4) Glue and Nail (2) 16X4 pieces of MDF together perpendicular to each other. This forms the base and the back of the toy box. In this picture, the toy box is laying on its back. Glue and nail the two end pieces to the 16X4 pieces. Make sure it's all square and even. Make sure you have the sides the same as the picture before nailing. We glued them wrong once (oops).
5)Find the middle of the toy box and mark so you know where to put the middle section. Glue and nail the middle section so that it matches the sides. It's easier to find where to nail if you use the square to draw the line where the nails go. Make sure the middle section is square.
6) Glue and nail the 12X4 board to the top. It should fit over the back and side pieces pretty perfectly. You may need to cut the length a little or you can just make the overhang even on both sides. Just check it before you glue it. You might want to check the length of the 12X4 board while you're still in the store to make sure it isn't shorter than the 16X4 boards.

7) Now for the front panel. It should fit perfectly along the bottom and front edges. If it's a little bit off, don't worry about it. The main thing it needs to do is hold the toys in the box. If it's off and bothering you, you can wood putty or sand until it gets to where you want it. Paint hides many flaws. You'll notice that there is a hole on the sides at the bottom. Just fill it with spackle, wood putty or caulk. If you use real wood on this, you'll need to get a wider board so you have room to cut the angle needed to avoid that hole. Since it was all getting painted, it was less work to just fill it in instead of messing with another cut.
 8)Fill in the holes and sand. We used that pink spackle stuff. For the paint, we used a self-priming semi-gloss. It took 3 coats for complete coverage using a paintbrush. You may want to consider sanding between coats for a smoother finish.
I hope this tutorial was complete and helpful! If anything is unclear, please let me know so I can fix it! Don't forget about the cure time for the paint. I'd say just figure on a month and you should be good to go. You can test it with your fingernail. If the paint isn't super solid, think about waiting longer. My plan is to use the boxes to form a square so the kids can play in the middle of the square. It should make cleanup a breeze since they just have to sling toys in the right box. Since this will be in the middle of the room, I didn't want any high walls getting in the way. I'm considering making some cushions to go on top of these. I'll have to see if they want to use it for seating or for displaying their Lego creations. I'll update this when we get the area set up. I haven't painted all of the boxes yet so it's going to be a while. Happy Building! If you make modifications, please let me know! I'm always on the lookout for cool ideas!

 Still plenty of work to do in here but the play area is usable now!